
Bringing native AI to your mobile apps with ExecuTorch— part I — iOS
 Jakub Chmura•Jun 17, 2024•8 min read
What is ExecuTorch?
ExecuTorch is a novel PyTorch-based framework that allows you to export your PyTorch AI models to formats suitable for local deployments on devices such as mobile phones or microcontrollers. This means that with a little bit of native code, you can easily bring AI features into your React Native apps. In the case of iOS, we can take advantage of the CoreML backend, which enables high-performance thanks to Apple’s Neural Engines.
In this series of tutorials, we’ll show you how to use AI models of your choice directly in your app, with no need for API calls.
1. Exporting a model
The first thing that you need to do is to export the model from PyTorch to .pte file, which is essentially a PyTorch Executable. We’ve covered that part for you, but if you’d like to use any of your models — this can be done using ExecuTorch’s Python API. If you want to reproduce, you can download the models from our repo. The models that we exported here, come from the PyTorch examples repository. Before doing that, setting up your environment is necessary. For a basic export tutorial, refer to:
Exporting to ExecuTorch Tutorial - ExecuTorch 0.2 documentation Author: Angela Yi ExecuTorch is a unified ML stack for lowering PyTorch models to edge devices. It introduces improved…pytorch.org
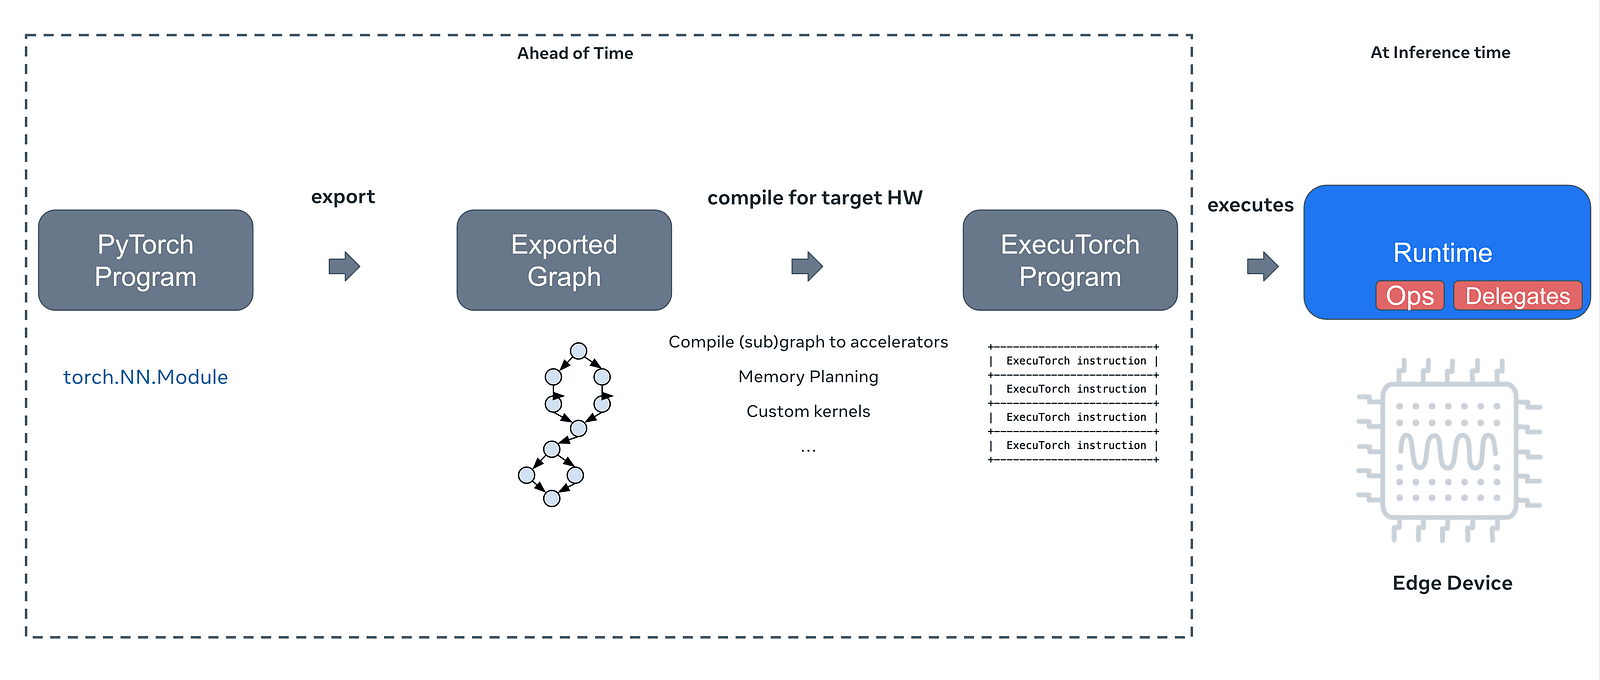
The whole process consists of multiple steps, depending on your use case. The model is first turned into its graph representation, which can then be optimized for your needs. This is a multi-step process that involves compilation, optional quantization, memory planning and finally exporting it into an executable. At runtime, ExecuTorch with a specific build for target hardware is used to efficiently perform inference on-device.
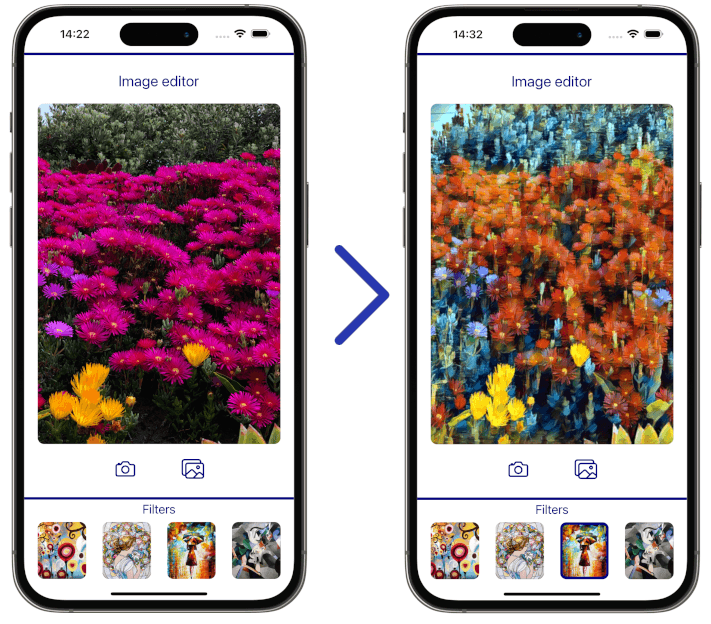
For this tutorial, we will use a style transfer model, which turns your images into this cool-artsy vibe — if you’re curious about how similar things can be done for web & video, check out our previous article. If you would like to use a model of your choice, you can use the script below. This should produce a .pte file suited for the CoreML backend.
executorch/examples/apple/coreml/scripts/export.py at main · pytorch/executorch On-device AI across mobile, embedded and edge for PyTorch - executorch/examples/apple/coreml/scripts/export.py at main…github.com
2. Building and setting up the library
Before we get to the actual coding part, you need to build the library and link it to your Xcode project. The building process is thoroughly explained in the docs, and we highly encourage you to get familiar with it. However, we have already built it and for your convenience, you can just download the build from our GitHub repo.
Once you have the library (coreml_backend.xcframework and executorch.xcframework), you need to go to your Xcode project -> Build Phases -> Link binary with libraries -> Click +, and add them to your project. You also need to add CoreML.framework and Accelerate.framework, which should be available for you in Xcode out-of-the-box.
Before we get into the coding part, you also need to go to Build settings -> Other linker flags, and add -all_load flag. This ensures that the library is properly linked.
3. The coding part — Xcode
Moving to the implementation, you’ll now need to create Objective-C++ file. Lets call it StyleTransferModule.mm. In our code, we call this method from our React Native app using native modules, however, this is an optional step and you can adjust it to your use case.
// StyleTransferModule.mm

#import "StyleTransferModule.h"
#import "ImageProcessor.h"
#import <executorch/extension/module/module.h>

using namespace ::torch::executor;

const int32_t imageSize = 640;
const int32_t numChannels = 3;

@implementation StyleTransferModule {
  std::unique_ptr<Module> styleTransferModel;
}

RCT_EXPORT_METHOD(initModule:(NSString *)modelFileName resolver:(RCTPromiseResolveBlock)resolve rejecter:(RCTPromiseRejectBlock)reject) {
    NSString *styleTransferPath = [[NSBundle mainBundle] pathForResource:modelFileName ofType:@"pte"];
    styleTransferModel= std::make_unique<Module>(styleTransferPath.UTF8String);

    if (styleTransferModel) {
        resolve(@"Module created successfully");
    } else {
        NSError *error = [NSError errorWithDomain:@"com.example.module" code:1 userInfo:nil];
        reject(@"module_error", @"Failed to create module", error);
    }
}
Firstly, you need to create an instance of Module class, which is a part of the ExecuTorch framework. This allows us to call the exported methods of our model, such as forward() . To instantiate the class, we need to pass the path to aforementioned .pte file. We also use the RCT_EXPORT_METHOD macro, to export the method to JS.
The next step before we run the model is to prepare the input tensor. You might be familiar with tensors if you’ve previously worked with any kind of machine-learning framework. On a high level, this is an array that can run on your GPU.
To create a Tensor, we need to get the raw RGB data of our image. In our repository, the code is a bit different since we’re loading multiple models. However, to keep things simple, we’ll stick to one model in this tutorial.
// StyleTransferModule.mm
RCT_EXPORT_METHOD(applyStyleTransfer:(NSString *)imageUri resolver:(RCTPromiseResolveBlock)resolve rejecter:(RCTPromiseRejectBlock)reject) {
{
    if (!styleTransferModel) {
        reject(@"module_error", @"Module not initialized", [NSError errorWithDomain:@"com.example.module" code:1 userInfo:nil]);
        return;
    }

    NSURL *url = [NSURL URLWithString:imageUri];
    NSData *data = [NSData dataWithContentsOfURL:url];
    if (!data) {
      reject(@"img_loading_error", @"Unable to load image data", nil);
      return;
    }
    UIImage *inputImage = [UIImage imageWithData:data];
Once again, we export the method to JS. We’ll call it applyStyleTransfer, and make it accept a NSString pointer, which corresponds to a standard JS string. Such string will be the URI to our input image. We will now need to create an array of raw RGB data since this is the kind of data that the model expects.
// StyleTransferModule.mm
// ...

  CGSize targetSize = CGSizeMake(imageSize, imageSize);
  UIImage *resizedImage = [ImageProcessor resizeImage:inputImage toSize:targetSize];

  // to float array - the input
  float *imageData = [ImageProcessor imageToFloatArray:resizedImage size:&targetSize];

  // make it a tensor
  int32_t sizes[] = {1, numChannels, imageSize, imageSize};
  TensorImpl inputTensorImpl(ScalarType::Float, std::size(sizes), sizes, imageData);
  Tensor inputTensor = Tensor(&inputTensorImpl);
Now we take our UIImage and pass it to our custom ImageProcessor. This is essentially a preprocessing part that varies based on the use case and the model. Here, we need a 640x640 image, that’s an array of float values. Keep in mind, that resizing isn’t always necessary, since it is possible to export a model with dynamic input shape. If you‘d like to see what exactly the ImageProcessor is doing, you can do so by clicking here. Once we have that, we need to create a tensor from that data by passing the data and size of the tensor to the TensorImpl constructor. Lastly, we pass TensorImpl to Tensor itself.
The next step is passing the tensor to our model. This part is pretty straightforward. All you need to do is wrap the previously created Tnesor in EValue, put it in a vector, and just run the forward() method (or any other method that you’ve exported). The reason we put it in a vector is that there are models that expect multiple inputs.
// StyleTransferModule.mm
// ...

const auto result = styleTransferModel->forward({EValue(inputTensor)});
if (!result.ok()) {
NSError *error = [NSError
        errorWithDomain:@"ModelForwardFailure"
        code:NSInteger(result.error())
        userInfo:@{NSLocalizedDescriptionKey: [NSString stringWithFormat:@"Failed to run forward on the torch module, error code: %i", result.error()]}];
  reject(@"model_failure", error.localizedDescription, error);
}
const float *outputData = result->at(0).toTensor().const_data_ptr<float>();
free(imageData);
We can check if any errors occurred during inference by calling .ok() method. The outputData variable is a pointer to the result of our model call. This can be anything from the probabilities of a classification task to LLM outputs. Lastly, we need to do some postprocessing steps and return the output image URI to the JS side.
// StyleTransferModule.mm
// ...

CGSize outputSize = CGSizeMake(imageSize, imageSize);
UIImage *outputImage = [ImageProcessor imageFromFloatArray:outputData size:outputSize];

// save img to tmp dir, return URI
NSString *outputPath = [NSTemporaryDirectory() stringByAppendingPathComponent:@"processed_image.png"];
if ([UIImagePNGRepresentation(outputImage) writeToFile:outputPath atomically:YES]) {
  NSURL *fileURL = [NSURL fileURLWithPath:outputPath];
  resolve([fileURL absoluteString]);
} else {
  reject(@"img_write_error", @"Failed to write processed image to file", nil);
}
And that is pretty much it. We’ve prepared a demo app to showcase how you can use this approach in your React Native apps. On the left side, you can see the original image, and on the right, you can see the output of the model.
Final thoughts
Congrats! You successfully ran the model. ExecuTorch is a huge framework that makes running models as big as LLaMa completely on-device possible.
The next part of this series will show you how to do the same on Android. We will also shortly release a tutorial on implementing a pretty impressive feature related to our object removal demo 👀. If you want to be in the loop about our AI and multimedia works, sign up for our RTC.ON newsletter. Stay tuned!
We’re Software Mansion: software development consultants, AI explorers, multimedia experts, React Native core contributors, and community builders. Hire us: [email protected].
Contact - Software Mansion Software Mansion S.A., a polish public joint stock company with its principal place of business at ul. Zabłocie 43b…swmansion.com